Salads
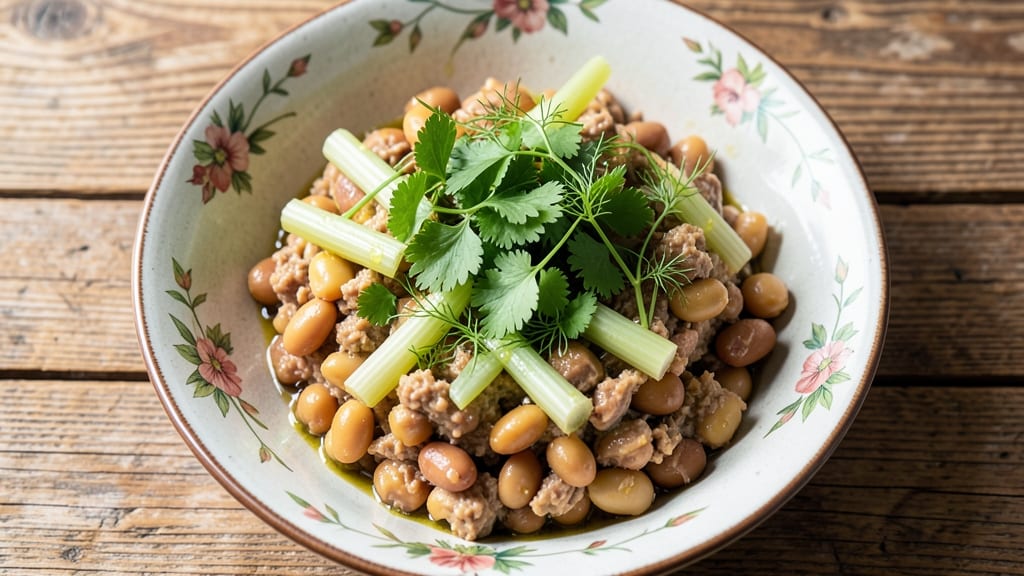
This bean salad dip recipe delivers a cool, creamy herb swirl that’s perfect for parties or snack time. The secret lies in blending cannellini beans with tangy lemon and fresh herbs, creating a velvety texture that’s both satisfying and protein-packed.
I’ve perfected the balance of flavors—creamy, tangy, and just slightly crunchy from the celery—to make it irresistible as a dip or side.
The beauty of this recipe is its simplicity: just a handful of ingredients mixed together, then chilled to let the flavors meld. The celery adds a satisfying crunch, while the herbs bring brightness and freshness.
It’s a vegan option that doesn’t skimp on flavor, making it ideal for any dietary preference. Plus, it’s ready in under 15 minutes—perfect for last-minute gatherings.
What you’ll end up with is a dip that’s smooth, creamy, and packed with texture—each bite delivers a mix of creamy beans, zesty lemon, and crisp celery. It’s the kind of dish that disappears quickly, leaving guests asking for the recipe.
Serve it with crackers, chips, or fresh veggies for dipping, or even as a side for grilled meats.
Best of all, this dip keeps well in the fridge for up to 5 days, making it a great make-ahead option. The flavors only get better as it sits, so you can prep it ahead and enjoy it all week. Let’s get started—this one’s a crowd-pleaser!
Ingredients for bean salad dip
These fresh, creamy ingredients blend into a velvety dip that’s perfect for parties or snack time.
| Ingredient | Amount | Notes |
|---|---|---|
| Canned Cannellini Beans 🌱 | 1 ½ cups | Drained, rinsed, no salt added |
| Fresh Celery Stems 🧅 | 1 cup | Finely chopped, crisp variety |
| Fresh Lemon Juice 🍋 | 2 tbsp | Freshly squeezed, zesty |
| Extra-Virgin Olive Oil 🫒 | ½ cup | High quality, fruity |
| Fresh Parsley Leaves 🌿 | ¼ cup | Chopped, flat-leaf preferred |
| Fresh Dill Weeds 🌿 | 2 tbsp | Chopped, fresh and bright |
| Garlic Cloves 🧄 | 2 cloves | Minced, fresh preferred |
| Vegan Mayonnaise 🥫 | ¼ cup | Unsweetened, creamy texture |
| Apple Cider Vinegar 🍎 | 1 tsp | For tangy brightness |
| Sea Salt 🧂 | ½ tsp | Fine grain preferred |
| Black Pepper 🌶️ | ¼ tsp | Freshly ground |
| Vegan Parmesan Cheese 🧀 | 2 tbsp | Nutritional yeast blend |
The cannellini beans are the heart of this dip—low-sodium is key to avoid saltiness. Trader Joe's has the best canned variety, but any no-salt-added brand works. Fresh celery adds that satisfying crunch, so pick firm, crisp stalks (the lighter the color, the fresher). The herbs? Fresh parsley and dill make all the difference—dried just won’t cut it here. For the olive oil, a fruity, extra-virgin brand like California Olive Ranch elevates the flavor. If you’re short on time, the vegan mayo can be swapped for cashew cream (blend soaked cashews with lemon juice) for a lighter texture.
No fresh herbs? Dried parsley at one-third the amount works in a pinch, but trust me, fresh is worth the extra minute. Short on celery? Fennel or cucumber adds a similar crunch. The lemon juice is non-negotiable—bottled won’t give you that bright zing. For extra creaminess, add 1 tbsp vegan yogurt to the mix. The vegan Parmesan is optional but adds a nice umami punch—Follow Your Heart brand is my go-to. If you’re making this ahead, skip the celery until serving to keep it crisp. The dip tastes even better the next day as the flavors meld together.
This dip keeps beautifully in the fridge for up to 5 days, sealed in an airtight container. The celery stays crisp if you add it just before serving. For parties, I like to serve it in a glass bowl with a sprinkle of vegan Parmesan on top—looks gorgeous and tastes even better. Double the batch—it disappears fast! Freezes well for 3 months if you want to make it ahead for holiday gatherings. Just give it a stir before serving to re-emulsify.
Why You'll Love This Recipe
- No-Cook Miracle: I swear by this—just mash those canned beans, chop celery into sticks (no fancy knife work), and toss with lemon and oil. Zero stove, zero stress, just pure satisfaction in 10 minutes.
- Bright & Crisp: That lemon juice cuts through the richness of the olive oil like a breath of fresh air, while the parsley adds a peppery punch. It’s bright enough to stand alone but rich enough to make chips or toast feel like a celebration.
- Party in a Bowl: Between us, this is my secret weapon for game day, potlucks, or when friends drop by unannounced. Serve it with crackers, toss it in wraps, or let people scoop it straight—it’s the kind of dip that disappears fast.
- Pantry Goldmine: Cannellini beans are cheap, celery lasts forever, and olive oil? Always on hand. I’ve made this for years, and it’s never let me down—whether it’s a last-minute snack or a meal prep lifesaver that keeps for days in the fridge.
Step-by-step instructions for bean salad dip
Here's how to blend everything into a velvety, herb-infused dip that's perfect for parties or snacking.
Mash the Cannellini Beans
Start by draining and rinsing the 1.5 cups canned cannellini beans thoroughly under cold water to remove any excess starch. Transfer them to a large mixing bowl and use a potato masher or fork to break them down into a chunky, rustic texture—think small, pea-sized pieces rather than a smooth puree. This texture gives the dip its signature hearty bite while keeping it light enough to spread.
I like to leave a few slightly larger chunks for visual appeal, but make sure there are no whole beans remaining. The beans should look like they've been lightly crushed, with no large lumps or smooth paste. This step is crucial for achieving that perfect balance between creaminess and texture in your dip.
Finely Chop and Combine Aromatics
In a separate small bowl, combine the 1 cup finely chopped fresh celery stems, 2 tbsp chopped fresh parsley leaves, 2 tbsp chopped fresh dill weeds, and 2 minced garlic cloves. This aromatic trio forms the flavor base of your dip, so take your time to chop everything uniformly. The celery should be cut into fine, even pieces—almost like a celery relish consistency—so it distributes evenly throughout the dip.
Add these chopped ingredients to the mashed beans and give everything a quick stir with a wooden spoon. You'll notice the herbs and celery will brighten the beans' earthy flavor while adding that fresh, garden-fresh aroma that makes this dip irresistible. This is also the perfect time to add the 2 tbsp fresh lemon juice and 1 tsp apple cider vinegar—these acids will help balance the richness and keep the flavors vibrant.
Create the Creamy Base
In a measuring cup, combine the 0.5 cup extra-virgin olive oil and 0.25 cup vegan mayonnaise. Whisk these together until fully emulsified—this creates a silky, creamy base that will bind all your ingredients. The olive oil adds a fruity depth while the vegan mayo provides that familiar, velvety texture we all love in dips.
Pour this oil-mayo mixture into the bean bowl and stir vigorously with a spatula. You'll want to work quickly and thoroughly to ensure everything blends smoothly. The dip should begin to take on a smooth, creamy consistency with just a hint of visible texture from the beans and celery. If it looks too thick, add 1-2 teaspoons of water at a time until it reaches your desired spreading consistency.
Season and Rest for Flavor Development
Season the dip generously with 0.5 tsp sea salt and 0.25 tsp freshly ground black pepper. Taste it immediately—you'll likely find it needs more salt, so adjust gradually until it's perfectly balanced. The salt enhances all the flavors while the pepper adds a subtle warmth that complements the herbs.
Now for the secret to maximum flavor: cover the bowl and refrigerate the dip for at least 30 minutes (I prefer 1 hour if you have time). This resting period allows all the flavors to meld together beautifully. When you return to it, you'll notice how much more cohesive and flavorful it's become—the herbs will have released more of their oils, and the lemon will have brightened even further.
Finish with Vegan Parmesan and Serve
Before serving, sprinkle the 2 tbsp vegan parmesan cheese over the top and gently fold it in with a spatula. This final ingredient adds a nutty, cheesy depth that ties everything together. The parmesan should be evenly distributed throughout the dip, giving each bite that satisfying umami punch.
Transfer the dip to a serving bowl and give it one final taste adjustment. Serve immediately with crisp veggie sticks, toasted bread, or crackers. The contrast of the cool, creamy dip with warm, crunchy accompaniments is what makes this dip truly irresistible. Enjoy it fresh from the fridge for the best texture and flavor experience!
Pro Tips For Making Bean Salad Dip
- Drain and Rinse Beans: The canning liquid is salty and metallic—skip the shortcut of using it straight from the can. Drain the beans, then rinse them under cold water to cut any lingering bitterness. I learned this the hard way after serving a dip that tasted like a sad, over-seasoned soup.
- Pulse Celery Small: Chopping celery into tiny pieces (not just rough chunks) makes it disappear into the dip without texture surprises. Use a food processor for speed, but pulse just until it’s finely minced—no puree. Overdoing it turns your dip into a sad, mushy mess.
- Add Lemon Gradually: Start with half the lemon juice called for, taste, then add more if needed. Too much acid kills the beans’ natural sweetness, and you’ll end up with a dip that tastes like a dressing. The first time I overdid it, I had to rescue the batch with a pinch of sugar—now I measure carefully.
- Toast the Parsley: Pulse fresh parsley leaves in the food processor with the beans and celery, but add a splash of olive oil first. Pulse briefly, then stop—you want chopped, not pureed. The oil toasts the parsley slightly, giving the dip a deeper, nuttier flavor without extra effort. (Yes, even if you’re impatient like me.)
Make-ahead tips for this bean salad dip
Prep Ahead Strategy
This bean salad dip is a make-ahead masterpiece—prepare it the night before and let the flavors develop overnight. The beans soften slightly, the herbs release more of their oils, and the lemon brightens even further.
I always make a double batch for parties because it disappears fast, and having it prepped means less work when guests arrive. 💫
Storage Containers
Use an airtight glass container with a tight-sealing lid to store your dip. I recommend a quart-sized mason jar or a stainless steel container—both keep the dip fresh and prevent any absorption of fridge odors.
Label it with the date so you can track freshness. For best results, store in the fridge at 40°F or below for up to 5 days.
Freezing for Later
If you're planning ahead for holiday gatherings or meal prep, this dip freezes beautifully for up to 3 months. Transfer it to a freezer-safe container, leaving ½ inch of headspace for expansion.
When ready to serve, thaw it in the fridge overnight and give it a good stir to re-emulsify. The texture will be slightly softer after freezing, but the flavor remains rich and vibrant.
Celery Hack
Here's my secret for keeping the celery crisp when serving: Add it only when ready to eat. Store the dip without celery in the fridge, then chop and mix in fresh celery just before serving.
This ensures that satisfying crunch stays intact, making every dip perfect. If you must store with celery, add a sprinkle of salt to help preserve its crispness for up to 2 days.
Batch Prep Tips
Double or triple the recipe for easy entertaining. I like to portion it into small serving bowls or shot glasses for easy grab-and-go snacking. For a festive touch, garnish with extra vegan Parmesan or a sprinkle of smoked paprika before serving.
The dip tastes even better the next day, so don’t hesitate to make it ahead—your guests will thank you! ⏰
Reheating (If Needed)
While this dip is best served cold, you can gently reheat it if needed. Transfer to a microwave-safe bowl and heat on low power (50%) for 20-30 seconds, stirring halfway. Alternatively, warm it in a small saucepan over low heat for 1-2 minutes, stirring constantly to prevent separation.
For the best texture, serve it chilled or at room temperature after reheating.
Nutrition facts
Frequently asked questions
Can I use other types of beans instead of cannellini?
Great Northern beans or chickpeas work beautifully—they hold their shape well and add a slightly different texture. For a creamier dip, try black beans or pinto beans. Just be sure to rinse them thoroughly to remove excess starch, which can make your dip too thick. The key is using beans that are firm enough to hold their shape while still breaking down slightly when mashed.
How do I make this dip extra creamy without mayo?
Blend ½ cup soaked cashews with 2 tbsp lemon juice until smooth for a rich, creamy base. Add this instead of the vegan mayo, then proceed with the recipe as written. For even more creaminess, stir in 1-2 tbsp vegan yogurt or silken tofu. The cashew version has a slightly nutty flavor that pairs perfectly with the herbs.
Can I make this dip ahead of time?
Yes! This dip actually tastes better after 24 hours in the fridge as the flavors meld together. Store it in an airtight container and add the celery just before serving to maintain its crispness. The herbs will release more of their oils overnight, making each bite even more flavorful. It keeps well for up to 5 days in the refrigerator.
What's the best way to serve this dip?
This creamy bean salad dip is perfect with crispy tortilla chips, toasted baguette slices, or fresh veggie sticks like carrots and bell peppers. For a party platter, serve it in a bowl with a sprinkle of vegan Parmesan on top. It also makes a great side for grilled meats or as a filling for vegan wraps—just spread it on tortillas with some greens and avocado.
Why did my dip separate when I refrigerated it?
This happens when the oil and water-based ingredients aren't properly emulsified. To fix it, whisk the dip vigorously with a fork or small whisk, then give it a good stir. For prevention, blend the olive oil and vegan mayo together first, then slowly incorporate the other ingredients. If it separates again, add 1 tsp Dijon mustard or 1 tbsp lemon juice to help bind it together.